In simple terms, a PSI (ψ) value is just a number which tells us how much heat energy gets lost at building junctions, (for example, where 2 walls meet to form a corner junction, or where a wall and floor meet).
The number or "PSI (ψ) value" tells us how much heat energy is lost through each meter of that junction, which is directly proportional to the temperature difference (°K or °C) between indoors and outdoors.
It's expressed as the number of Watts (W) of heat energy lost, per meter (m) of the junction length, per degree (°K or °C) temperature difference between indoors and outdoors, hence the unit W/m/K.
Therefore, if we know the PSI value, we can work out heat loss at a building junction using the following formula:
The PSI value gives us an insight into what's going on beneath the surface of your building! You may have spent time, money and effort making sure that the walls, roofs and floors are well insulated and up to the latest spec, but if you neglect the details at the corners and other junctions, you might end up with thermal bridging in those areas which allows the precious heat energy to go straight past all of that insulation!
Confidence Quiz - Try using the formula above to work out heat loss for the junctions below
Juntion 1 – Well-performing corner junction
The length of the corner junction is 10m. The PSI value is 0.05 W/mK. Indoors the temperature is 20°C, and outdoors is 0°C. What is the heat loss?
Roughly the same as running a small LED bulb.
Junction 2 – Poor-performing corner junction
Again, the length of the corner junction is 10m. This time the PSI value is 1.164 W/mK. Indoors the temperature is 20°C, and outdoors is 0°C. What is the heat loss?
Over 23× more heat loss — like putting a small electric heater outside and running it continuously!
Not all the time, it depends on your specific project!
If your junction designs and details are the same as a pre-existing PSI calculation, you can re-use that calculation on as many projects as you like!
A good SAP/HEM assessor like Approved Building Consulting will be able to find existing PSI calculations to fit many common designs without requiring any additional calculations to be made.
New bespoke calculations are only required when one doesn't already exist for that specific junction design. This can be quite common in timber frame construction and metal frame construction, where the arrangement of timber or steel studs at these junctions can be highly varied.
If you can't find any existing PSI value calculations applicable to your design, then you will almost certainly require some bespoke calculations. Without these, the SAP/HEM assessor will be forced to use "Default" values in the assessment. These are essentially assumed "worst-case-scenario" values, and almost always guarantee failure to comply with building regulations!
If for some reason your building project pre-dates Part L 2021, your assessor may be able to apply the more generic "approved" government PSI values. These were quite favourable in assessments but were ruled out when Part L 2021 came in as they weren't deemed accurate enough for modern standards. At Approved Building Consulting, we will always explore any avenue to save you time and money before recommending you have work carried out.
If you're not sure whether you need PSI calculations carried out, please feel free to get in touch for a no obligations chat about your project.
In order to be able to model and calculate the PSI value for a building junction, we will require the following information:
- A detailed section drawing of the junction/s requiring modelling, showing all materials within the junction
- Drawings should be to scale, and all materials clearly labelled
- We normally work with Vector PDF files, or CAD files
- If architectural drawings are not available (for example, if you are trying to determine condensation risk in an existing building element) then we can sometimes create a model based on what information is available. If this is the case then please contact us directly rather than using the online quoting tool.
Simply put, a lower PSI value is a better PSI value!
Since the PSI value represents heat loss, a lower value is better because it means there is less heat escaping from the building!
In practice, calculated PSI values get compared against set reference values in the background of SAP assessments to show how the actual "Dwelling Fabric Energy Efficiency" (DFEE) compares with the "Target Fabric Energy Efficiency" (TFEE). Different junction types have different reference values! If you want to know if a specific PSI value is a good one, a good rule of thumb is to compare it to the reference value for that junction in .
Reference PSI Values (SAP Table R2)
| Reference | Junction Detail | Ψ Value (W/m·K) |
|---|---|---|
| Junctions with an External Wall | ||
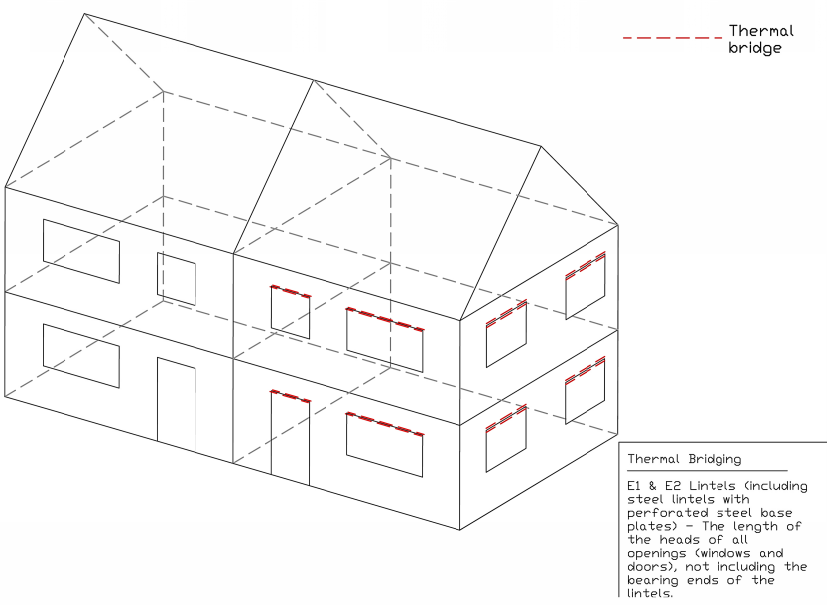
| E1 | Steel lintel with perforated steel base plate | 0.05 |
| E2 | Other lintels (including other steel lintels) | 0.05 |
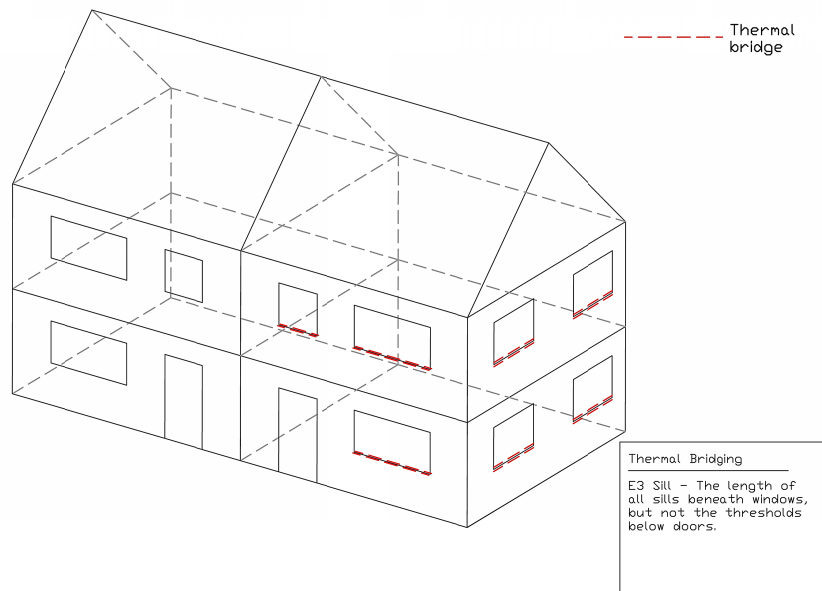
| E3 | Sill | 0.05 |
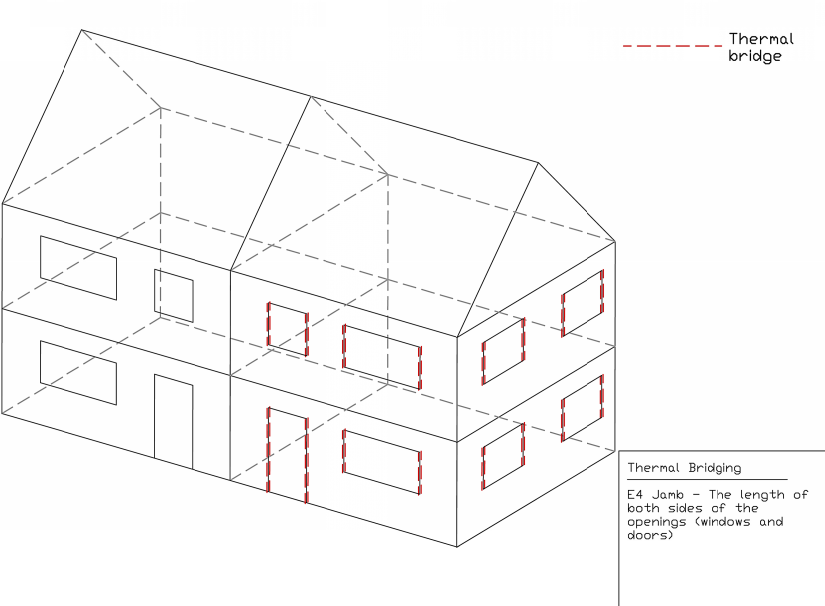
| E4 | Jamb | 0.05 |
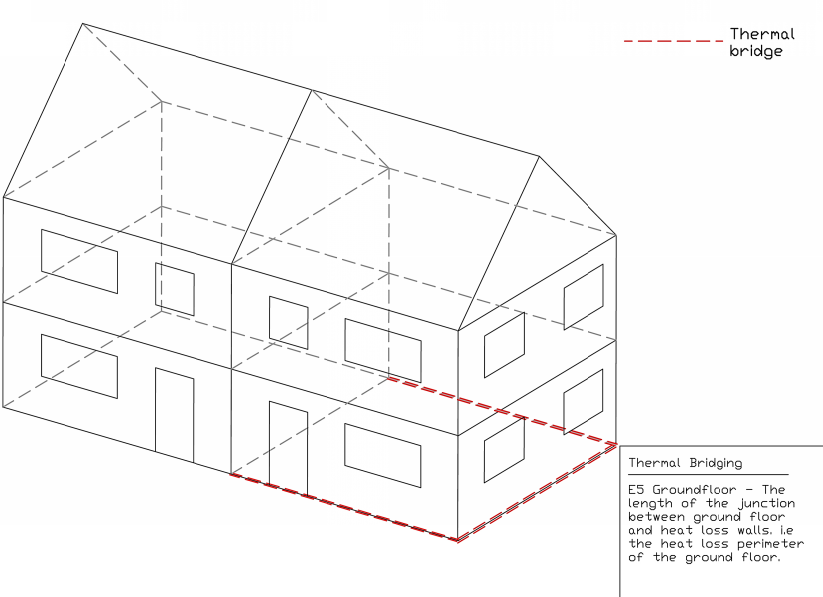
| E5 | Ground floor (normal) | 0.16 |
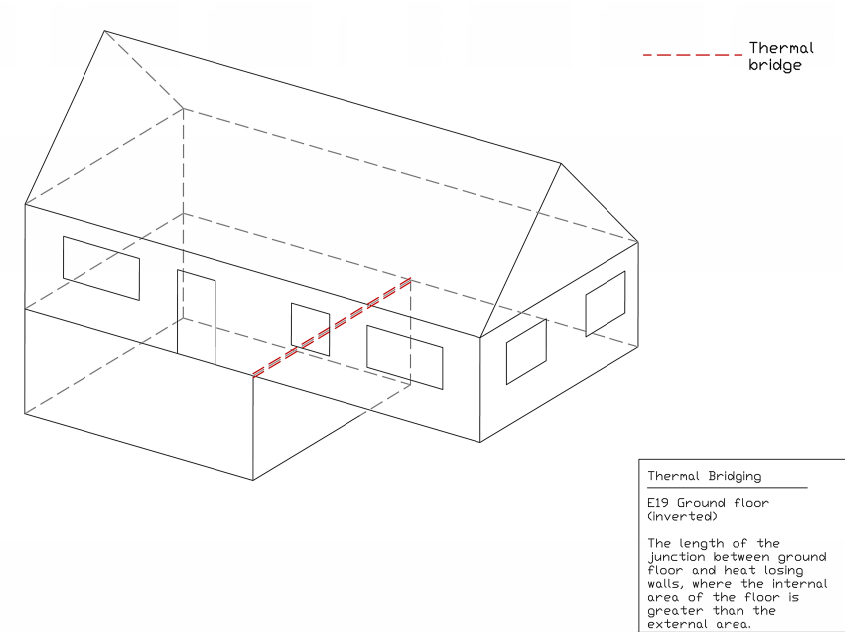
| E19 | Ground floor (inverted) | 0.07 |
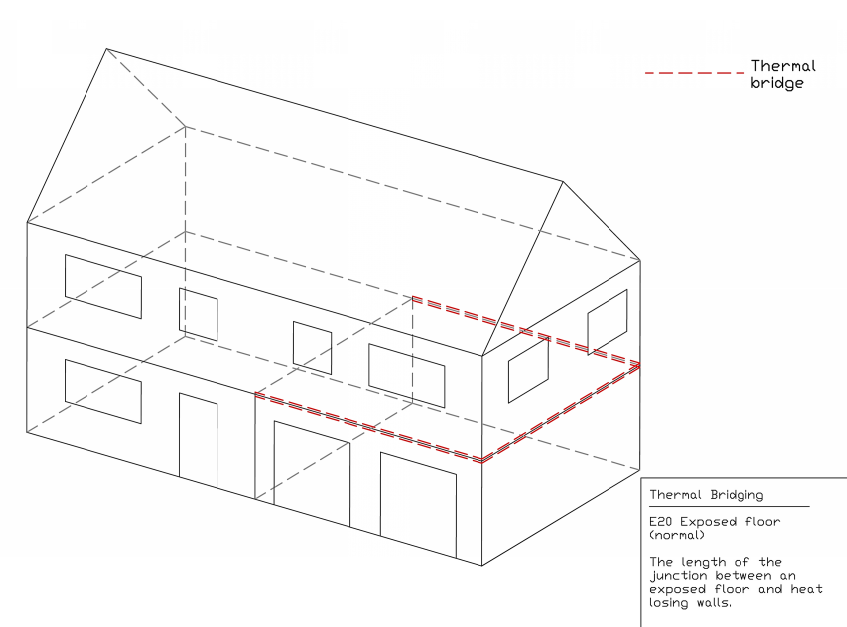
| E20 | Exposed floor (normal) | 0.32 |
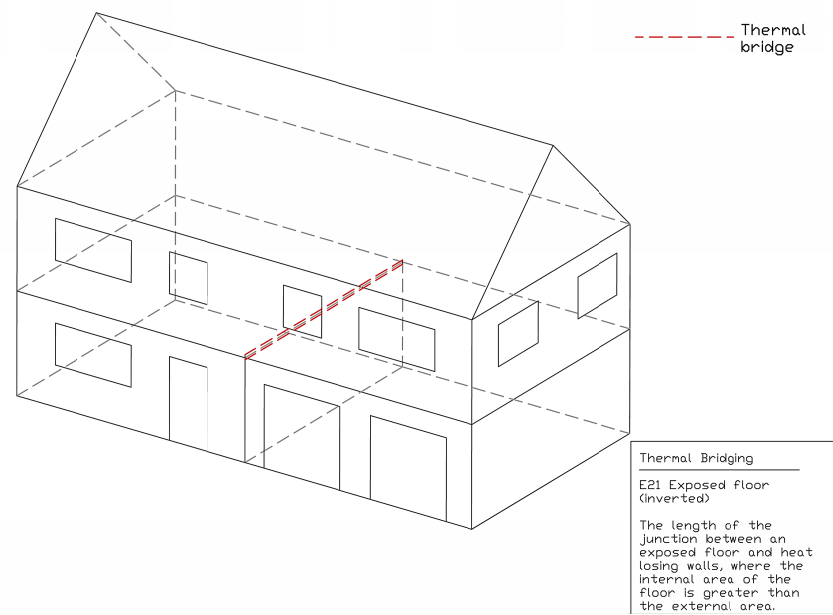
| E21 | Exposed floor (inverted) | 0.32 |
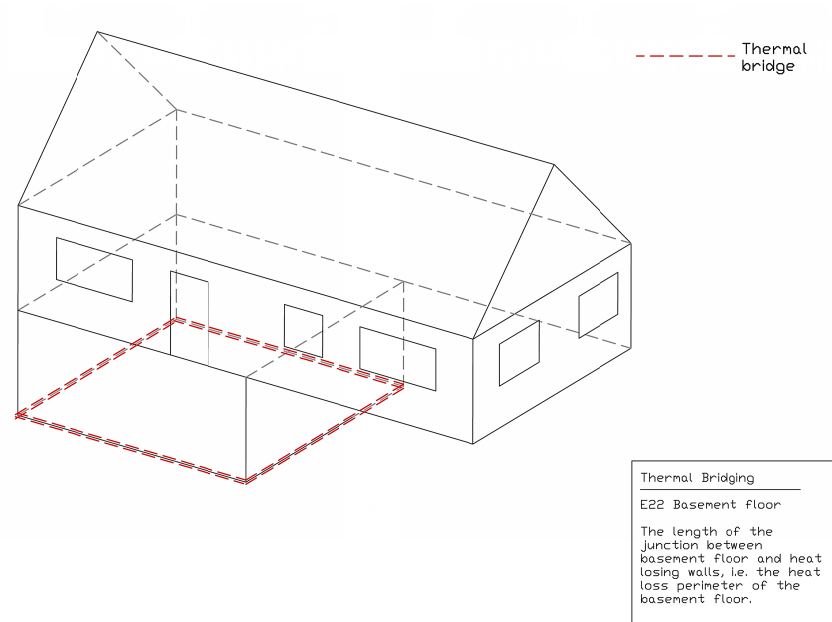
| E22 | Basement floor | 0.07 |
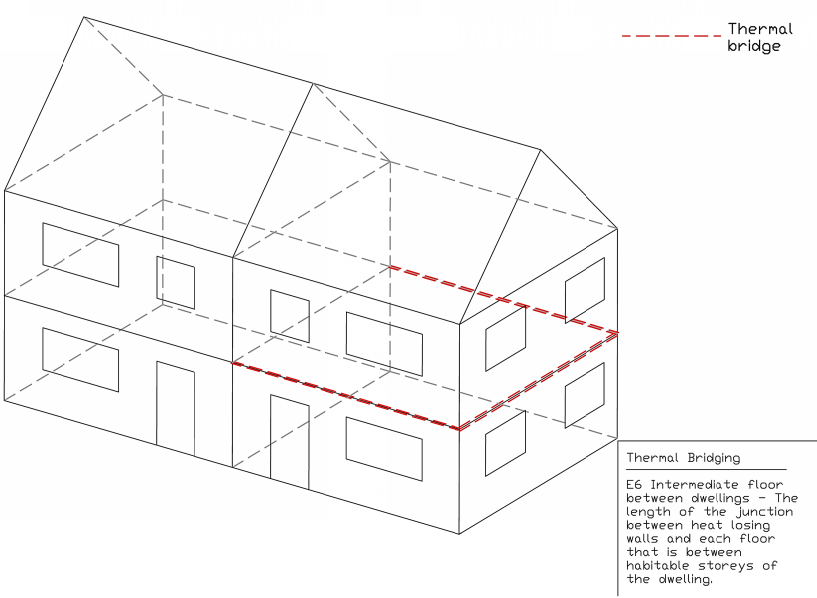
| E6 | Intermediate floor within a dwelling | 0 |
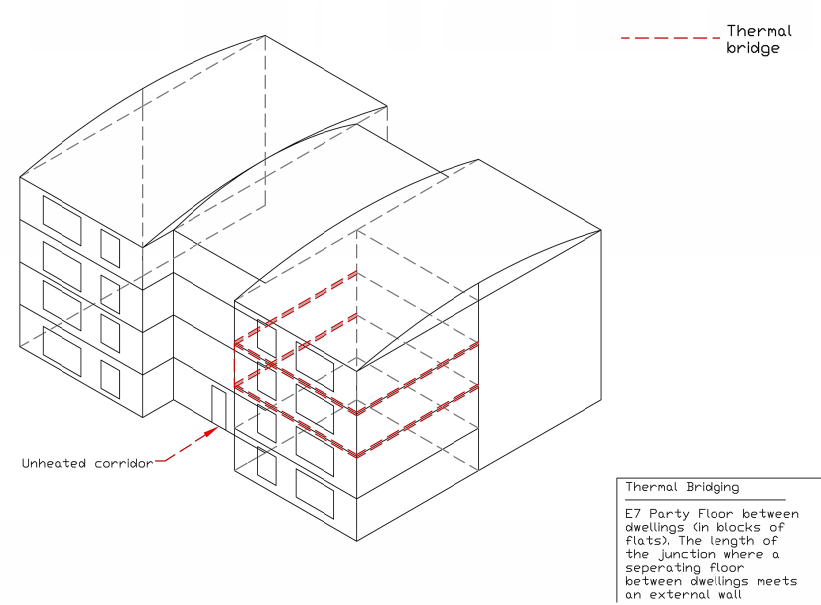
| E7 | Party floor between dwellings (blocks of flats) | 0.07 |
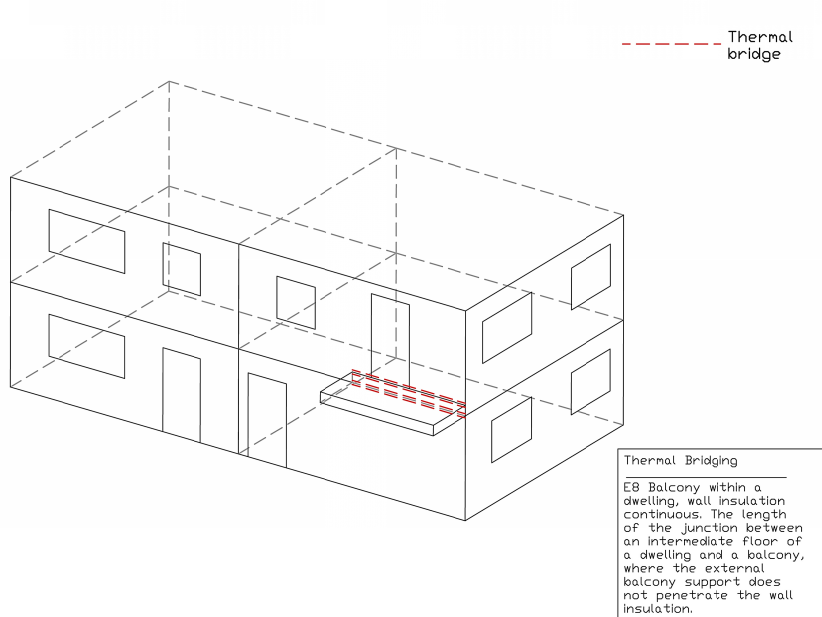
| E8 | Balcony within a dwelling (insulation continuous) | 0 |
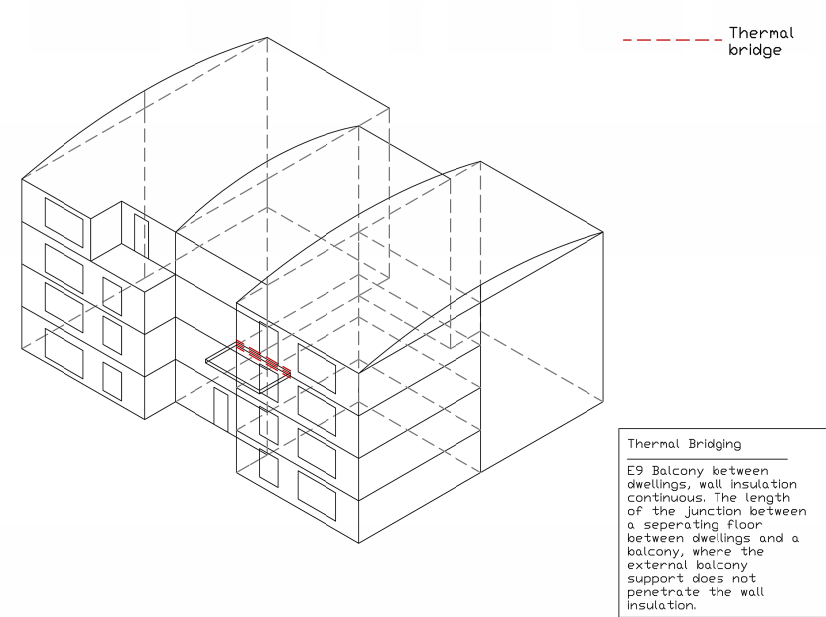
| E9 | Balcony between dwellings (insulation continuous) | 0.02 |
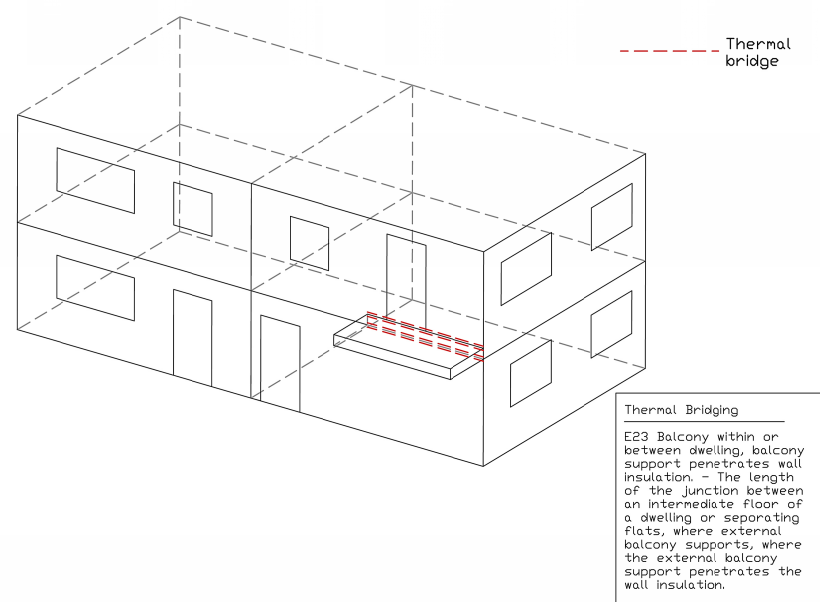
| E23 | Balcony where support penetrates wall insulation | 0.02 |
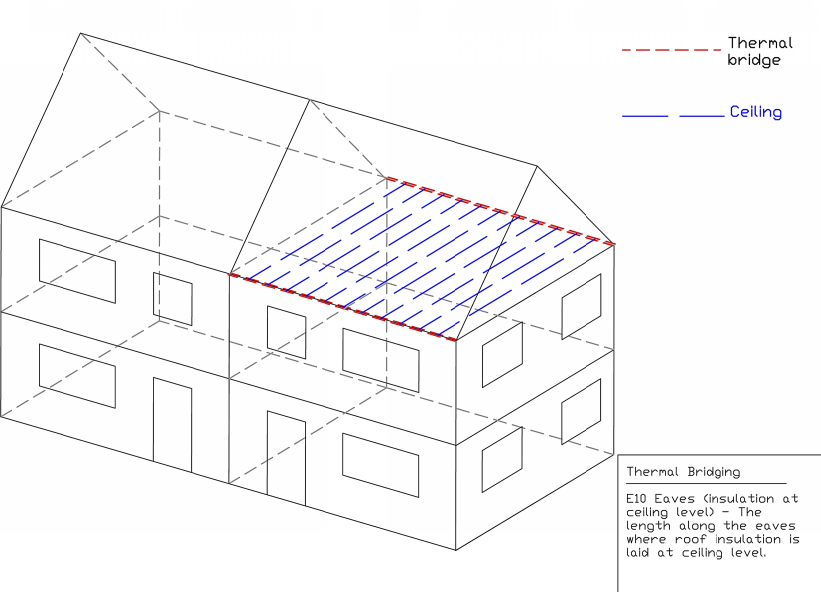
| E10 | Eaves (insulation at ceiling level) | 0.06 |
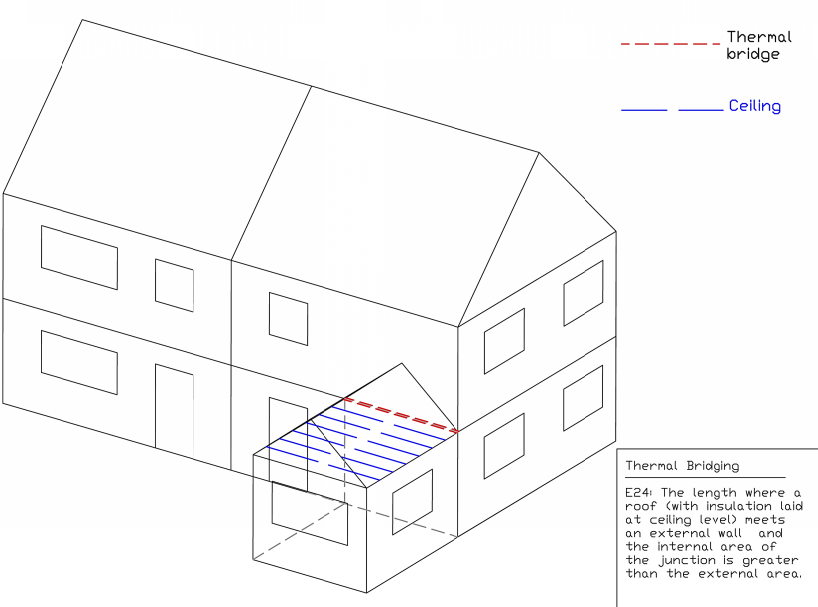
| E24 | Eaves (ceiling insulation – inverted) | 0.24 |
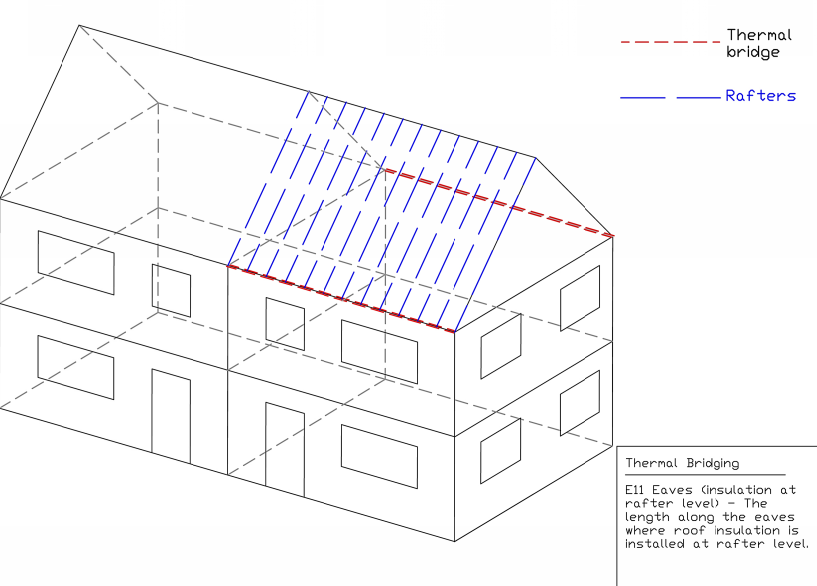
| E11 | Eaves (insulation at rafter level) | 0.04 |
| E12 | Gable (insulation at ceiling level) | 0.06 |
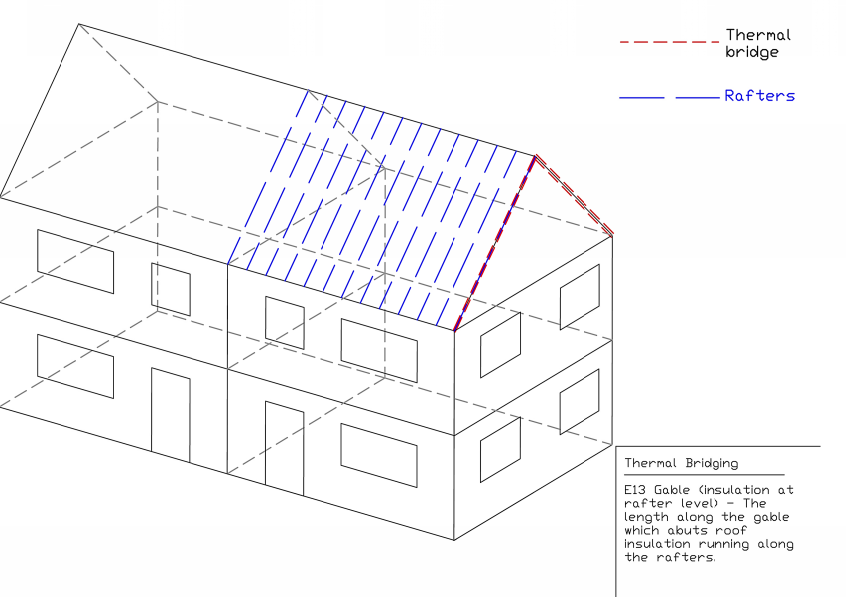
| E13 | Gable (insulation at rafter level) | 0.08 |
| E14 | Flat roof | 0.08 |
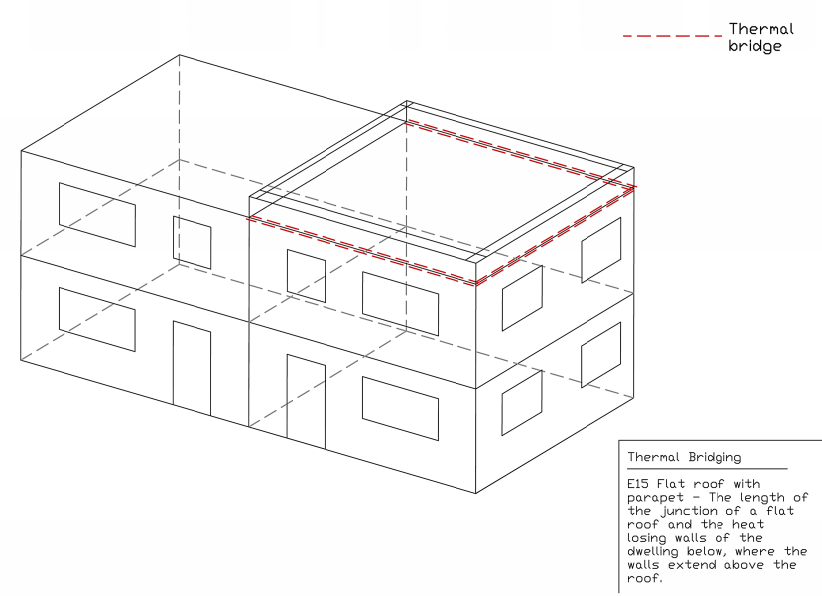
| E15 | Flat roof with parapet | 0.56 |
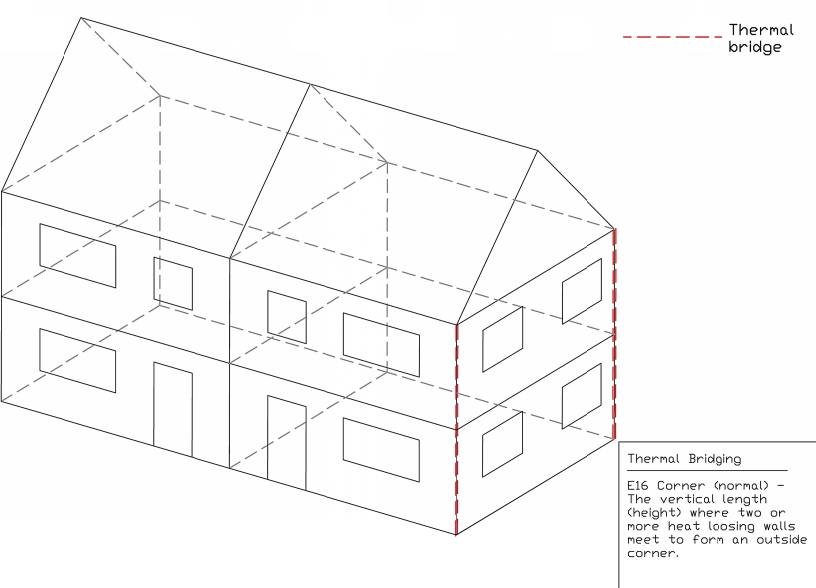
| E16 | Corner (normal) | 0.09 |
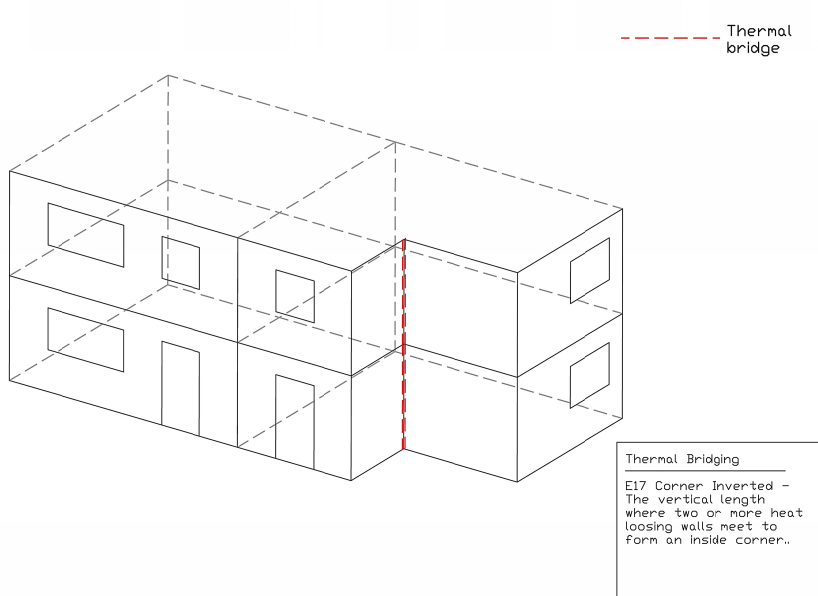
| E17 | Corner (inverted) | -0.09 |
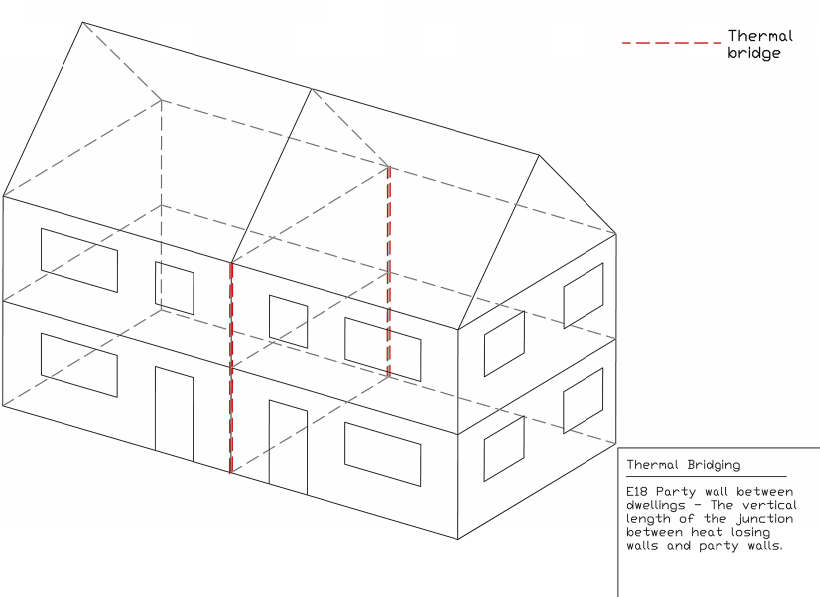
| E18 | Party wall between dwellings | 0.06 |
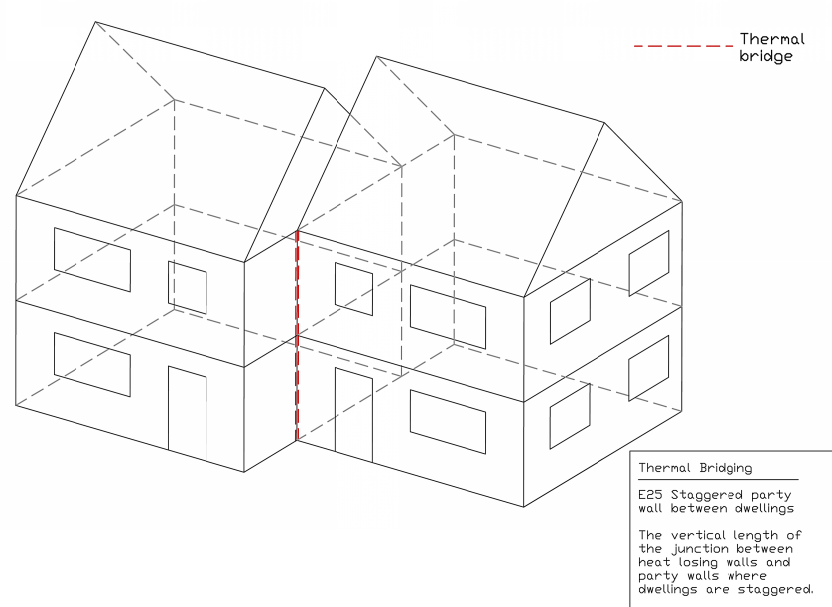
| E25 | Staggered party wall between dwellings | 0.06 |
| Junctions with a Party Wall | ||
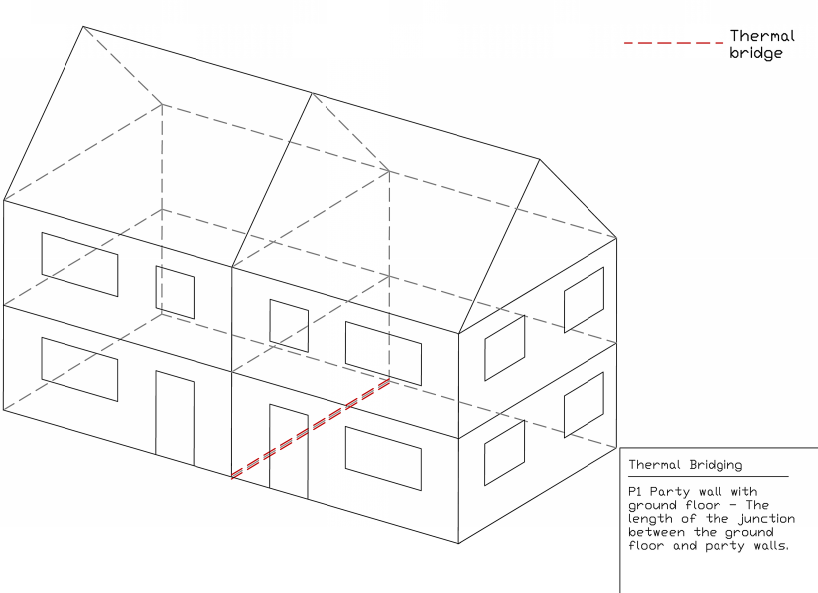
| P1 | Ground floor | 0.08 |
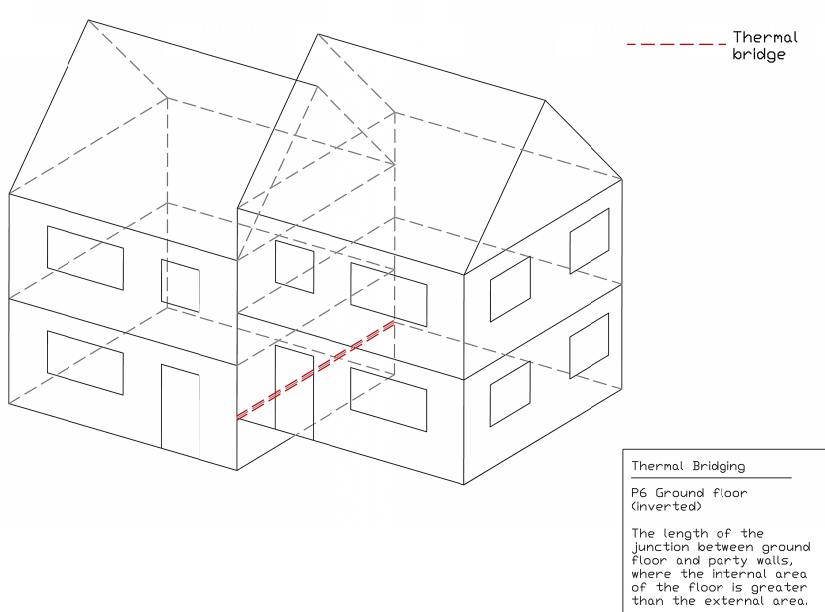
| P6 | Ground floor (inverted) | 0.07 |
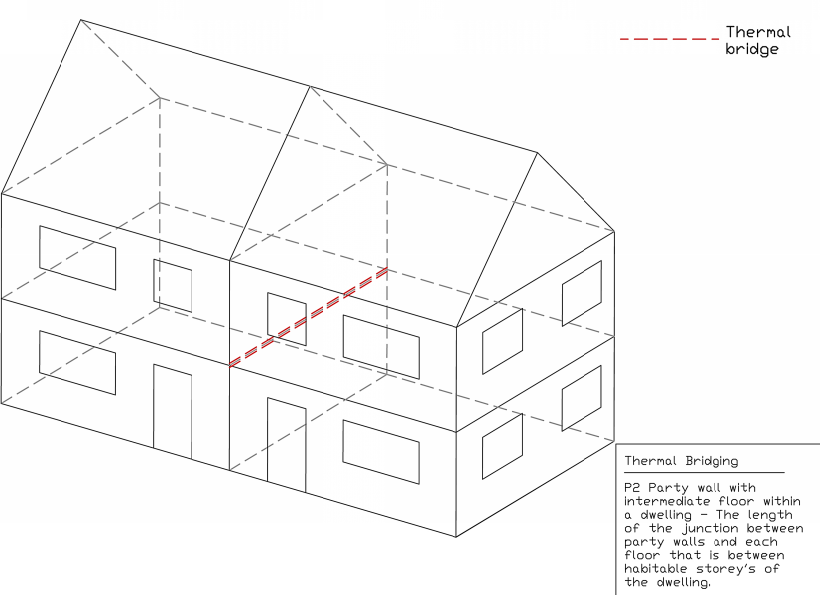
| P2 | Intermediate floor within a dwelling | 0 |
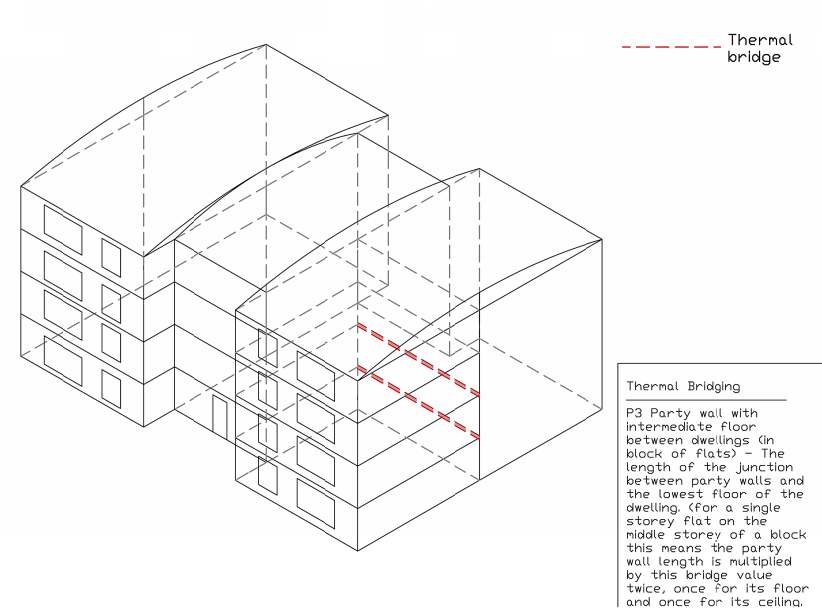
| P3 | Intermediate floor between dwellings | 0 |
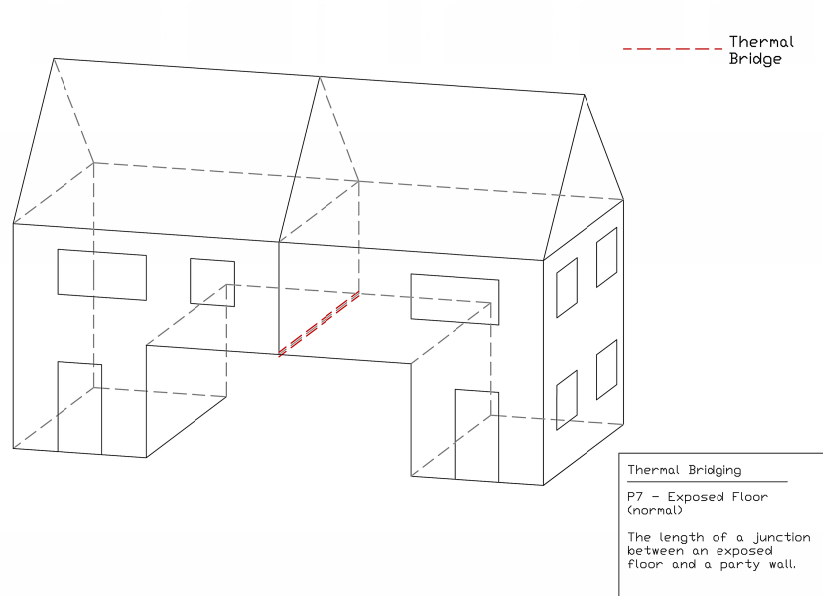
| P7 | Exposed floor (normal) | 0.16 |
| P8 | Exposed floor (inverted) | 0.24 |
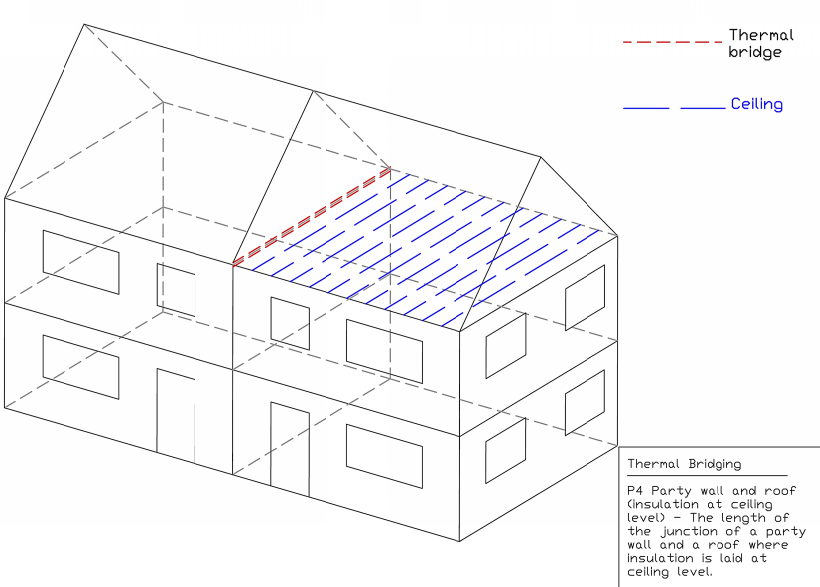
| P4 | Roof (insulation at ceiling level) | 0.12 |
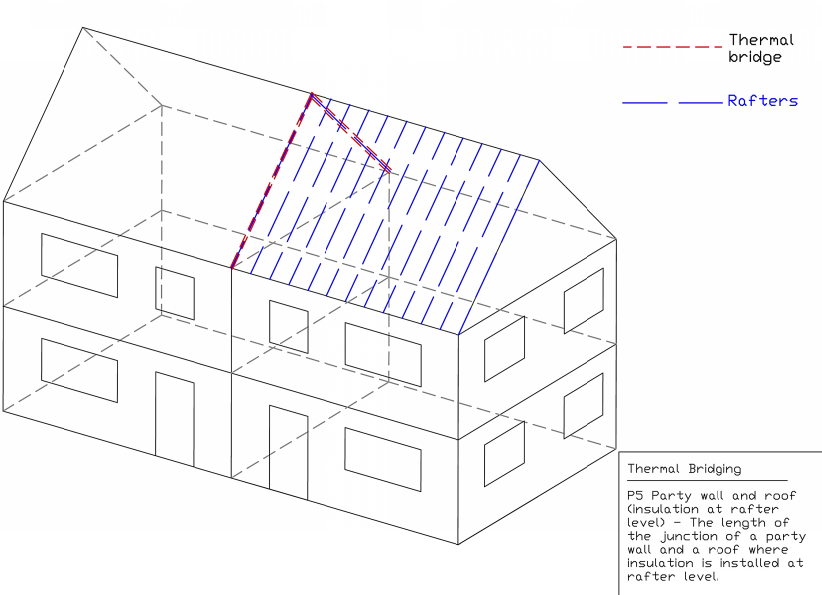
| P5 | Roof (insulation at rafter level) | 0.08 |
| Junctions within a Roof / Room-in-Roof | ||
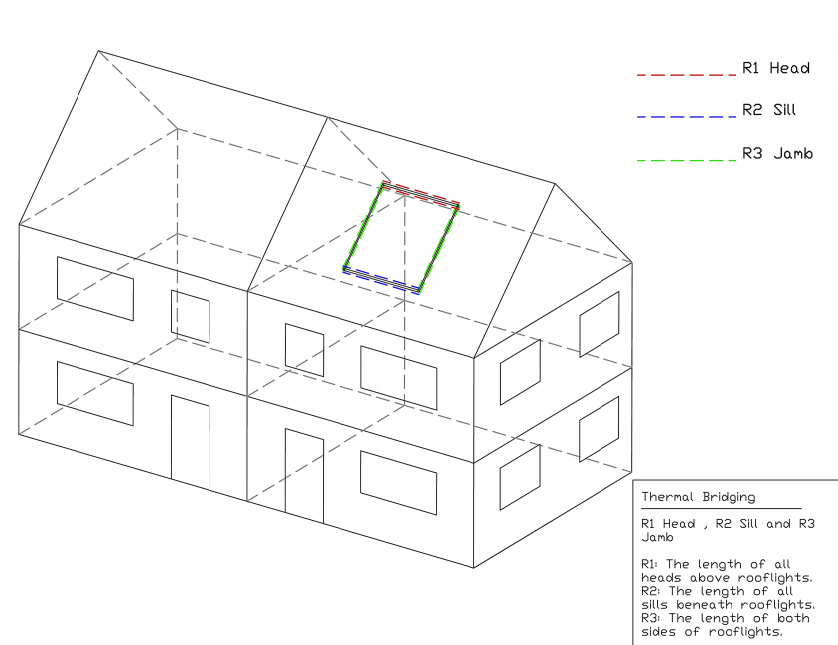
| R1 | Head of roof window | 0.08 |
| R2 | Sill of roof window | 0.06 |
| R3 | Jamb of roof window | 0.08 |
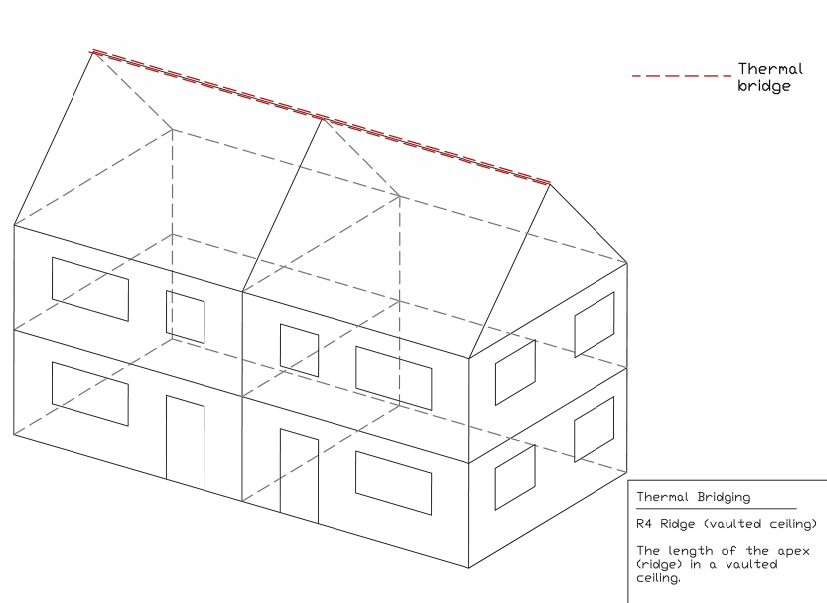
| R4 | Ridge (vaulted ceiling) | 0.08 |
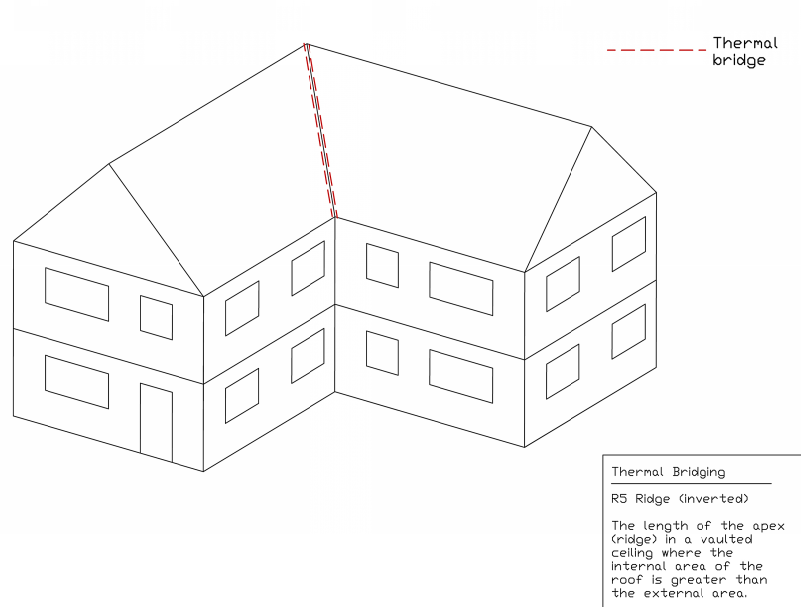
| R5 | Ridge (inverted) | 0.04 |
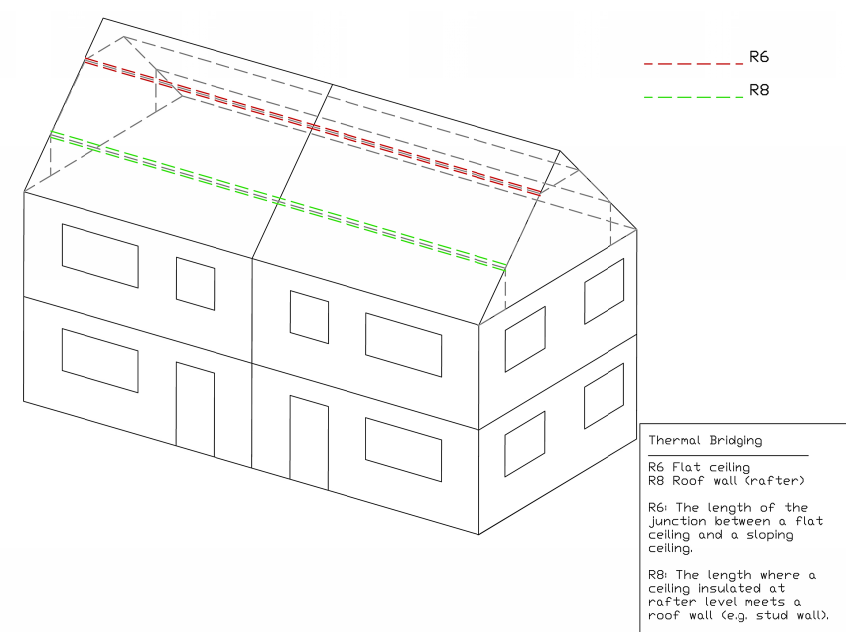
| R6 | Flat ceiling | 0.06 |
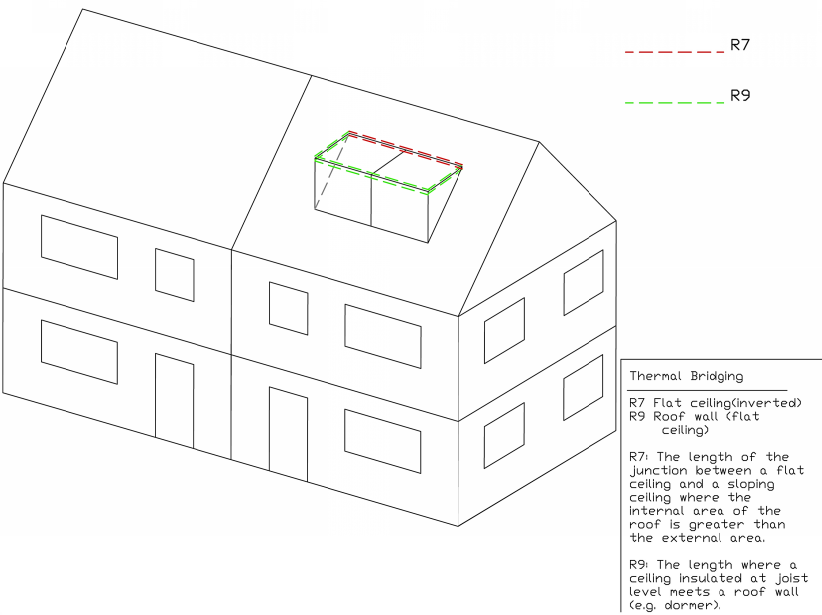
| R7 | Flat ceiling (inverted) | 0.04 |
| R8 | Roof to wall (rafter) | 0.06 |
| R9 | Roof to wall (flat ceiling) | 0.04 |
| R10 | Other room-in-roof junctions | 0.08 |
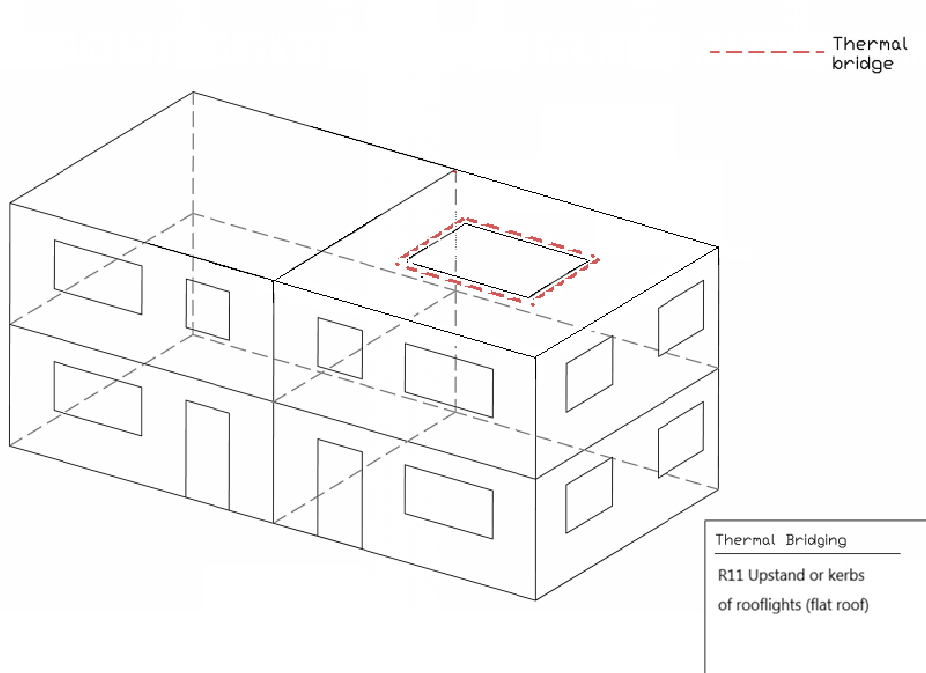
| R11 | Upstands / kerbs of rooflight | 0.08 |
It's worth noting that PSI values can be a bit of a balancing act. Having a "bad" PSI value can be ok if the junction length isn't too long, and/or if there are significant "good" PSI values in the assessment which counteract it, so no need to panic straight away.
At Approved Building Consulting, we calmly look at the whole picture. If you're worried about a bad PSI value/s or not meeting Building Regulations Part L requirements, get in touch, and we can let you know if your PSI values balance out well, or where they could be improved if necessary.
PSI values are calculated by trained assessors using specialised computer software.
An assessor looks at detailed drawings usually provided by an architect, which focus on the junction in question, and show all the building materials used within that junction. The assessor uses this information to create a 2D or 3D model of that building junction within a specialist software. The software then simulates heat flowing through the junction, and calculates how much heat is being lost. Finally, the assessor interprets the results, converting them into the PSI values which can be used within SAP assessments.
The above is a very brief overview of the process. In reality, the in-depth processes, rules, formulas and conventions for carrying out accurate PSI calculations are notoriously complex. It's important that your assessor has a confident understanding of the specific processes for each junction, and can show that they are qualified to carry out these assements with a reputable training provider such as Elmhurst Energy. Poorly calculated assessments not only risk the validity of Part L compliance, but can also tangibly increase risk of heat loss, condensation and mould growth when the building is complete.
Put simply, 3D calculations are more complicated to model than 2D calculations.
In PSI calculations, a junction is considered 3D when it has a significant thermal bridge/s in the 3rd dimension (I.e. perpendicular to the direction of the junction) The best way to show this is probably with an image as below.
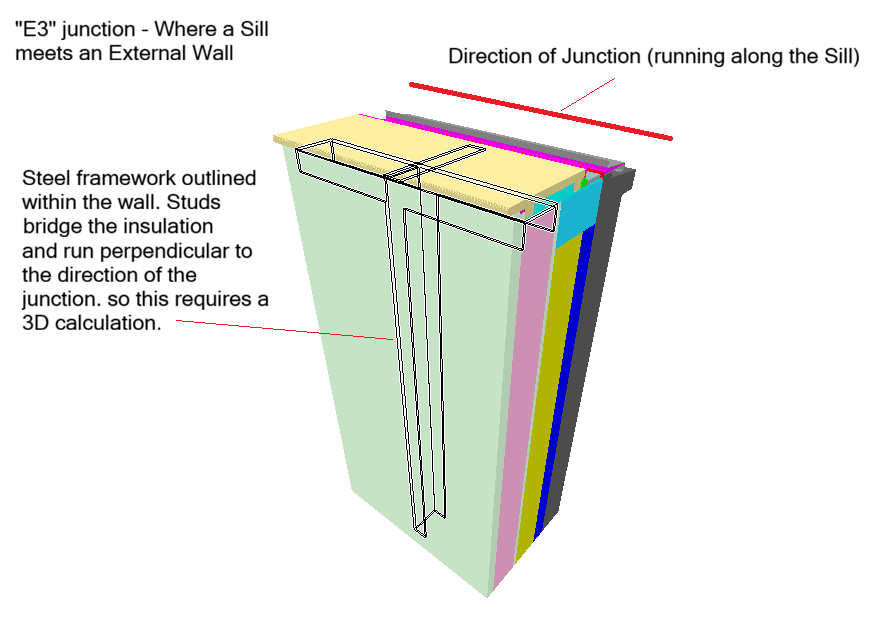
These types of junctions require significantly more time to model, and the software applications which can process them are more complex and expensive than many 2D calculation applications.
In practice, 3D calculations are often ones which utilise metal framework as part of the building structure. This is because the metal framework has a high thermal conductivity and often bridges an insulation layer.
Other junction types can also require 3D calculations. For example, all ground floor to external wall junctions require a 3D model to accurately assess the fRSI value (for condensation risk analysis)
We can provide 2D and 3D calculations where required. If you're not sure which you need, get in touch and we'll happily have a no obligations chat to talk through it, and provide you with a competitive quote.
Select a junction to see an example detail.
Junctions with an External Wall


Junctions with a Party Wall
Roof / Room-in-roof Junctions

The key concept here is to keep all internal surfaces thermally separated from external surfaces.
While calculating PSI values can get quite complicated, the concept of designing a good junction is fairly straightforward. Keep the inside and the outside of the building thermally separated!
In an ideal world, this means a decent continuous unbroken layer of well-performing insulation/s wrapping around the junction, either within the build-up keeping the internal materials warm, or externally wrapping all the building materials.
Of course, in practice this is often easier said than done, especially when structural aspects need to be taken into consideration too.
Poor PSI values often occur when there is a non-insulative material penetrating (aka “bridging”) the insulation layer, and providing heat energy with an “easy” escape route!
Whatever your design looks like, we're happy to work with you, and see if we can achieve an improved result together.
With our current workflow, we can normally carry out 3 or 4 2D calculations in a day, or 1 or 2 3D calculations, depending on the complexity of the junctions. We endeavour to price our 2D and 3D calculations very competitively off the bat, and additionally offer a loyalty scheme for repeat customers with tiered discount levels on all of our services.
Our current lead time will depend on the amount of ongoing work we have, but is available along with the latest prices by using our online quoting tool. Alternatively, do get in touch via phone or email if you have questions and would like to confirm details, and we will happily work out how we can best help you.
| Misconception | Response |
|---|---|
| "Can't I just get away with using default values? I know someone who said they did before." | Default values will almost always cause failure under Part L 2021. Your friend might be referring to 'Approved' values which were allowed under earlier versions of regulations, but aren't allowed since Part L 2021 came into effect. If your project falls under an earlier version of regulations however, we can apply the Approved details. |
| "Can't I just stick some more insulation in the walls to improve the PSI values?" | No, it's counter-intuitive, but that might actually make them worse! To improve the PSI value, we need to focus on improving the junction itself, not the surrounding 'flanking elements' such as the walls, floors and roofs. |
| "Some of these PSI values are negative numbers! Does that mean the junction is somehow gaining heat energy?" | Wouldn't that be helpful? :) But unfortunately no. The reason we sometimes see negative PSI values is because of how the junctions are modelled and assessed in relation to U-value calculations and SAP assessments. The heat 'gain' you're seeing here is usually actually reclaiming the heat loss which has been excessively accounted for in certain other parts of the SAP assessment. |